Inserting Windows and Doors into your Floor Plan
Visual Building includes a large catalogue of windows and doors, from which you can simply drag and drop into place into your floor plans.
Ensure that your current layer/floor is active in the view when placing windows/doors. For example, if you have the floor plan layer of your upper floor active, then you cannot insert elements into your ground floor.
The selection of the correct layer is to be ensured before inserting elements. Especially if you have already created a building with multiple floors using our Project Wizard.
Windows and doors can only be placed into walls.

Selecting doors and windows from the catalogue
You can insert windows and doors in two ways, by selecting the button on the building toolbar, or directly from the catalogue on the right side of the software window.
Using the button option, you can select the type of window/door in the Properties dialog.
If you use the catalogue option, you have directly accessed the component.
If you use the catalogue option, you have directly accessed the component.
Within the catalogue we recommend the category WINDOW CONSTRUCTIONS tool for windows, as these types of windows offer additional properties and options, rather than the previous/older windows made of 3D objects.
Doors always consist of 3D objects with some additional properties.
If you cannot find a suitable door you can also add your own door objects.
These 3D door objects can be found on the Internet. The 3d door Object need to be converted into our format and has to have the appropriate properties in order to work. Assistance for this feature is available on request.
If you cannot find a suitable door you can also add your own door objects.
These 3D door objects can be found on the Internet. The 3d door Object need to be converted into our format and has to have the appropriate properties in order to work. Assistance for this feature is available on request.
You can also draw your own window constructions with an additional plugin, contained in your Premium version, if your windows are special and not contained in our standard catalogue.
Inserting windows and doors in a wall
Simply drag the window/door from the catalogue over your target wall. As soon as a wall is recognized under your mouse cursor, you automatically get a preview and can insert the component with a left mouse click. You can then make any changes in size etc. later in the property dialogs for the window/ door.
While you see the preview element and before it is inserted into the wall, you see an arrow symbolizing the opening direction. Its direction depends on the position of the mouse relative to the wall axis, so it may change as you move the mouse. However, you can change the opening direction at any time later with two clicks.
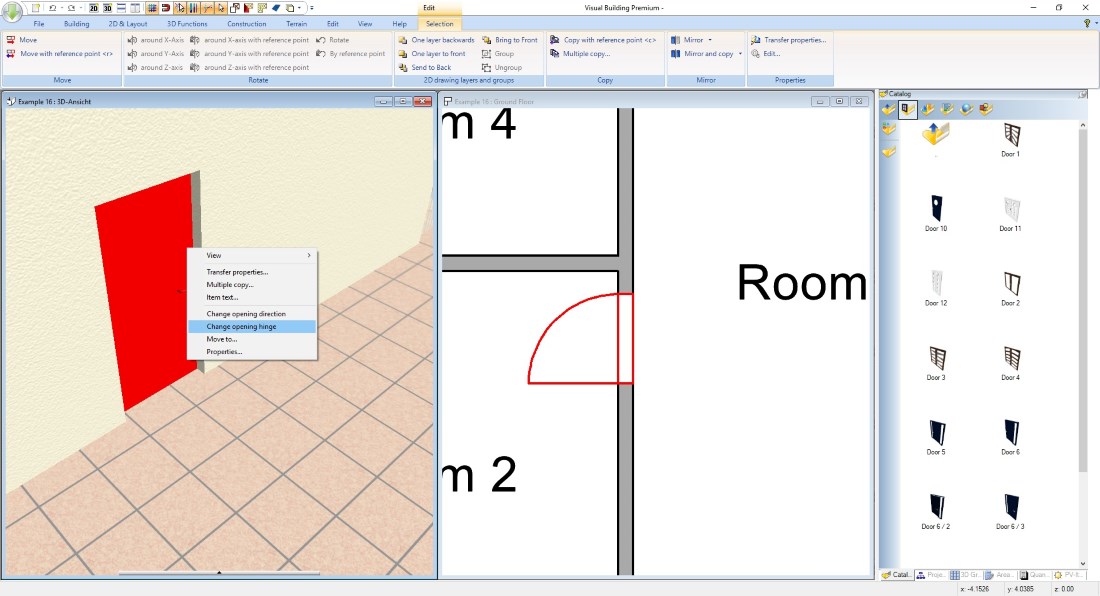
Windows and doors – changing opening direction and hinge
Select the window/door, click with your right mouse button and select the entry from the context menu.
Positioning windows and doors
With version 9 we have completely revised and simplified our tools for inserting and positioning windows and doors.
If you drag and drop a window or a door from the catalogue or via the respective button onto a wall, different dimensions appear automatically, each depending on the current situation in your floor plan.
These are initially only for your orientation. So you don't have to try to get an exact value here. Instead, simply insert the element with a left mouse click, roughly at the desired position.
Then select it with a left mouse click. Various dimensions appear again, such as distances to the next window, to your interior walls, etc. Each dimension shows a +/- symbol with which you open the dialog for numerically changing this distance. Enter the desired value and press ENTER or click OK in the dialog.
The following short video shows how easy it is.
Changing materials on windows and doors
As with all other 3D elements in Visual Building, you change the material e.g. on a window frame by dragging and dropping a material from the catalogue onto it in a 3D View.
Tip: Transfer properties
Especially with windows, it is often very helpful to transfer the properties of window to others, e.g. if you have changed the color of the window frame. You would have to repeat this process individually for each window frame in the project. With our transfer properties tool that is done in seconds.
- Change the colour of a frame by dropping a different material or colour from the catalogue on it.
- Now select the modified window and choose "Transfer properties ..." from the context menu.
- In the drop down list with properties you choose only the window materials.
- Now transfer the materials of your current window to all other windows in your project
- Now select the modified window and choose "Transfer properties ..." from the context menu.
- In the drop down list with properties you choose only the window materials.
- Now transfer the materials of your current window to all other windows in your project


Visual Building Basic
Has been developed as an easy to use design and visualisation tool for self builder,extentions..
£60.00
List price
List price
£39.00
Special online offer
Special online offer
Visual Building PRO

Used by all user groups specifically to create professional plans...
£120.00
List price
List price
£99.00
Special online offer
Special online offer
Visual Building Premium
Our most powerful design and visualisation tool specifically created for ...
£180.00
List price
List price
£149.00
Special online offer
Special online offer