What’s new in Visual Building 10 :
An overview of the new features in our Visual Building versions 10 .
As always, we have added features and content that we have filtered out of the suggestions and wishes of the users.
Main new features:
- New automatic dimensioning tools
- Automatic dimensions for floor plans or single walls
- New automatic item texts
- Downloading 3D –Objects from websites directly into your planning (PRO and Premium Versions only)
- Updated import formats for Sketchup 3D-Objects (format 2017 - 2020)
- More than 200 new 3D-Objects in our standard catalogs
- More than 250 new 2D Symbols in our catalog
- Area information of simple 2D graphic elements
- Hiding dormer walls in 2D top views / floor plans
- ...
Details
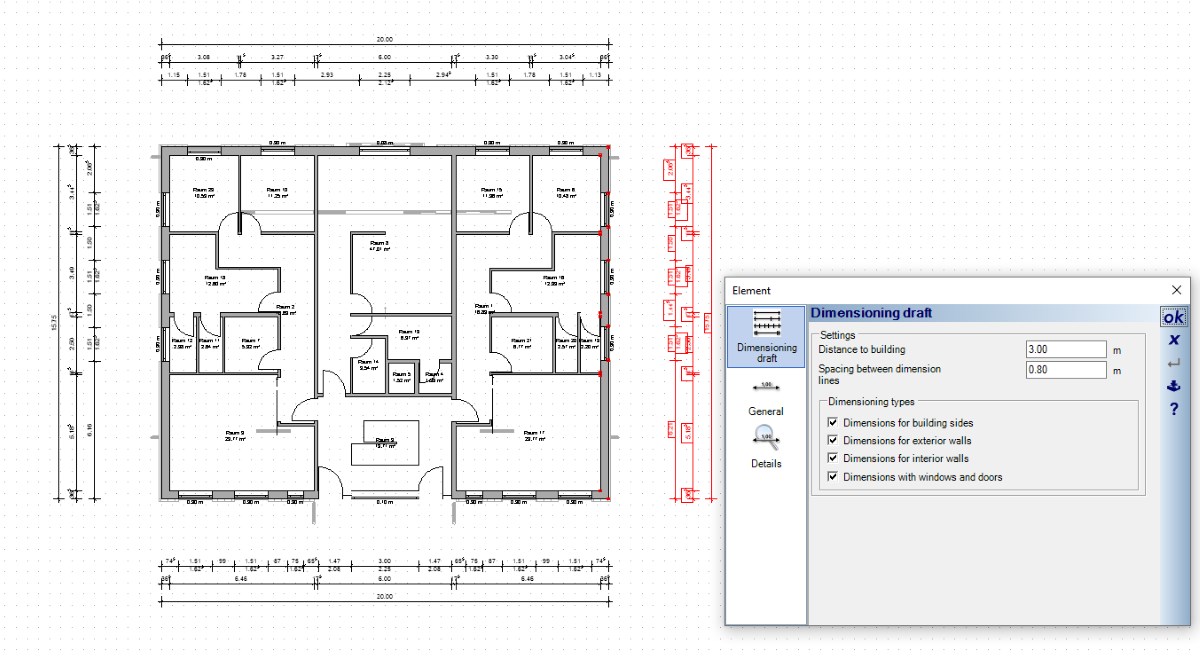
Automatic Dimensioning of floor plans
With two new tools on the dimensioning menu, you can now generate an automatic dimensioning draft. There is a variant that automatically creates dimensions for the active layer / floor plan and another tool for a single wall.
In addition to the usual setting options, the dimensioning draft dialog contains another property page on which you can define the distance between the inner dimension and the side of the building as well as the distances between the dimension lines created. A maximum of four dimension lines for each building side are created.
• Dimension for building side: the overall dimension of the building
• Exterior wall dimensions: if there is an offset in the facade
• Interior wall dimensions: a dimension line that includes the interior walls adjoining the exterior walls
• Dimensions with windows and doors
When generating an automatic dimensioning draft, the current floor plan is analyzed and the required dimension lines are generated depending on the floor plan layout. Regardless of the settings in our dialog, it can happen that you do not receive the four activated dimension lines, but only those that make sense. If there are no windows and doors in one side of the building and no offset in the facade, the software creates, for example, only two dimension lines instead of the predefined four.
Dimensioning drafts are only generated for 2D plan views, not in section and elevation views.
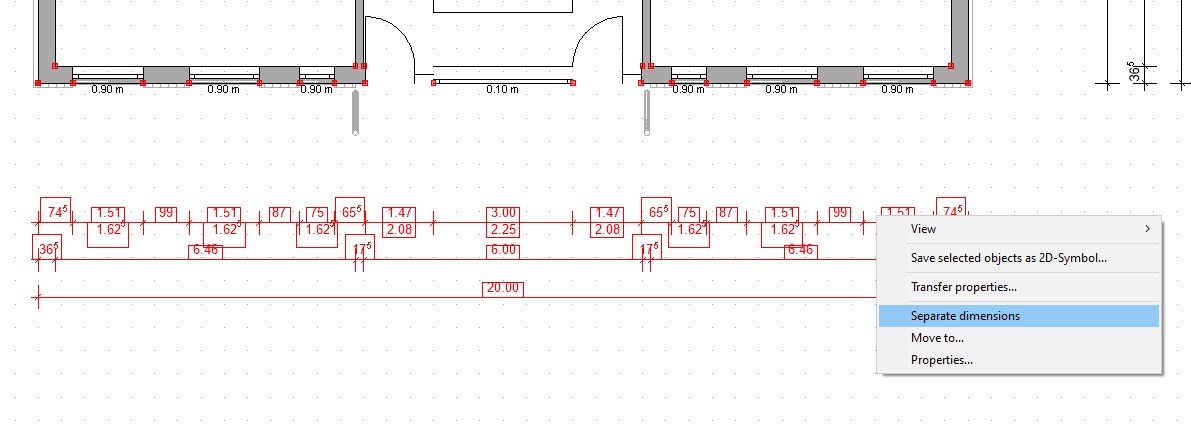
Separate automatic dimensions into individual dimension lines
Automatic dimensioning drafts exist as a combined element for each side of the building and are therefore independent objects. Since not every automatic dimensioning proposal always delivers the desired result, it may be necessary to split up the unit into individual parts in order to delete single dimension lines, to reposition them, or to add a dimension line that was created manually instead.
In such cases, you can simply separate the selected draft into its individual parts using the context menu.
In such cases, you can simply separate the selected draft into its individual parts using the context menu.

Automatic item text
Automatic item texts are used where you want to establish a connection between your drawings and the numbering of building elements in our quantities plugin. The identification with numbers and description corresponds exactly with the one in our quantities tree on the right side of the software. This numbering is unique for the project.
So if you need drawings in which you can see in your floor plan which wall is meant with "Wall 1" and where it is, you can simply generate automatic item texts. Text can also mean the representation of only the number. Create automatic item texts using the TEXT button on our 2D & Layout ribbon.
The item texts only relate to the current planning status and are therefore not updated if you enter additional walls or windows. In such cases, just restart the item text process. The software automatically recognizes which elements already have this identification and retains their position. Only elements that have not yet been created receive a new item text. However, the 2D representations are overwritten and must first be redefined in the dialog so that no item texts with different contents and different representations arise at this point.

Downloading 3D –Objects from websites directly into your planning (PRO and Premium Versions only)
Until now it was already possible to use the 3D Converter PlugIn itself to convert 3D objects from other file formats into our own (* .cyg), save them in to your catalogue for further usage in a planning process.
The new functionality is designed to simplify that and thus to work faster, because the selection of a 3D object, download, conversion and planning happens in one step.
Directly accessing Internet pages with 3D objects
The Online 3D Objects button on our 3D Functions ribbon gives you menu entries that refer directly to a website or search engine. By default, two entries are predefined, Google and 3D Warehouse. You can create additional menu entries using the Settings dialog or the browser window.

Browser and Preview Dialog
We have integrated a separate Internet browser into the dialog. At the top there are a few buttons and an option “Enable Popups”. Pop-ups are suppressed by default, but there are websites with 3D objects that only allow files to be downloaded from a pop-up window. So if you come across such a page and nothing happens while you try downloading, allowing popups could be an option.
When the download starts, you will see a progress bar at the bottom of the browser dialog for the download itself and the subsequent automatic conversion into our own 3D format.
When the download starts, you will see a progress bar at the bottom of the browser dialog for the download itself and the subsequent automatic conversion into our own 3D format.

The Preview Dialog
The preview dialog shows the 3D object after being converted, i.e. as it would look in our software. The quality and the representation depend on the original model or the modeller of the 3D object. So if it doesn't meet your expectation, stop here and choose another item. Some of the imperfections could be revised using the plug-in 3D converter, but there is a separate manual for this.
On the right of the 3D preview you find some information about the downloaded object. First of all, this includes size. Depending on the output format, this can already be correct. However, some objects also show sizes of several hundred meters or just a few centimeters. If necessary, scale the 3D object appropriately before inserting and saving it.
Note: if the size changes drastically, e.g. from a hundred meters to 1 meter, the object may apparently disappear from the 3D view. You may have to zoom the preview again by pressing the HOME key.
Updated import formats for Sketchup 3D-Objects
From version 10, the Sketchup formats (* .skp) 2017 to 2020 are also supported.
More than 200 new 3D-Objects in our standard catalogs
With version 10 we have added more than 200 new 3D objects to the standard catalog.
The additions concern the following catalog categories.
• 35 new doors. Double doors, doors with side windows, exterior doors
• 14 cars
• More than 65 bathroom objects
• 94 3D objects for your office
The additions concern the following catalog categories.
• 35 new doors. Double doors, doors with side windows, exterior doors
• 14 cars
• More than 65 bathroom objects
• 94 3D objects for your office
More than 250 new 2D Symbols in our catalog
More than 250 2D symbols have been added to the catalog, including those with a filled and colored representation.
Hiding dormer walls in 2D top views / floor plans
Dormer walls can be switched invisible for 2D top views using the dormer dialog. This was not possible with the previous visibility, because it was not possible to differentiate between normal walls and walls in dormers. You can now achieve this result with two options, separately for side walls and the front wall of your dormer.

Area information of simple 2D graphic elements
Closed 2D graphic elements such as rectangles, polygons etc. now show the area in their properties dialog.
Other changes and improvements
• Lightweight and partition walls now only have one wall layer with 10 cm thickness.
• The list of recently opened projects now has 12 instead of 6 entries.
• When entering windows in external walls, these are now always automatically placed opening inwards
• There is now an new zoom option (project-based): All views - Show all
• Properties can now also be transferred to other terrain elements bed, terrace, water and path
• When entering height points, the height of the last entered point is retained for new entries and the dialog accepts the data for the input with ENTER.
• Handling of cursoring when changing the size of elements in 2D simplified. Elements can now be moved or changed directly with the mouse.
• Scaling of 3D objects in 2D plan views with the mouse
…